Well it doesn’t matter that you use Pentium 4 (1.2GHz) Processor.
Stage 1 : Uninstall unwanted softwares


2. Click on “Disk Cleanup” button, and then wait for some time till it scans the drive.


You still can make your system reasonably fast.
Please note:
This article is for Windows XP.
It’s best to perform in the stage order.
The more deeper you go more small sacrifices you make for the only goal “Performance”, “Performance” and “Performance”.
Following are the stages below:
Stage 1 : Uninstall unwanted softwares
1. Open Control Panel -> Add or Remove Programs

2. Remove software that are not being used, by clicking Remove buttons
3. Follow the ‘Next’ button, until the software is successfully uninstalled.
Stage 2 : Free more space in C Drive
1. Delete unwanted files, only the ones you created, in C drive.
2. Move all the files, only the ones you created, to some other drives.
Note: Don’t touch any system files or Windows folder or Program Files folder
3. Whenever installing a program next time onwards, keep the destination folder as d:\Program Files\
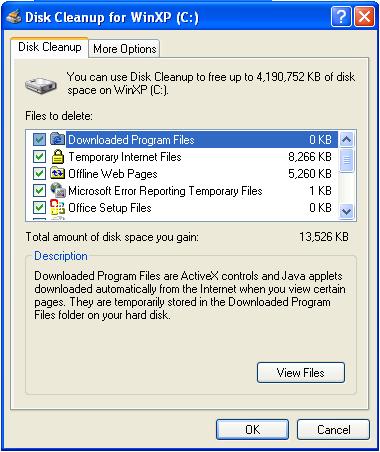
Stage 3 : Cleanup the Disk
1. Right-click on C Drive -> Properties
2. Click on “Disk Cleanup” button, and then wait for some time till it scans the drive.
3. Mark Tick in all the checkbox to safely delete all unnecessary files, and then click ‘Ok’ button.
Stage 4 : Increase Virtual Memory
1. Right-click on ‘My Computer’ -> Properties
2. Select ‘Advanced’ tab -> Click ‘Settings’ under Performance Section.
3. In ‘Performance Options’ Wizard -> ‘Advanced’ tab
4. In ‘Virtual Memory’ section -> click on ‘Change’ button.
5. In ‘Virtual Memory’, select C: drive
6. Select ‘Custom Size’
7. Enter Initial size (MB): 2046
8. Enter Maximum size (MB): 3000 or 4092
9. Click on ‘Set’ button and then on ‘Ok’ button.
Stage 5 : Scan and Clean for Viruses
1. Full scan your computer using the antivirus.
2. Delete the entire virus found.
Stage 6 : Disk Defragmenter
1. Right-click on ‘My Computer’ -> Manage
2. In right menu ‘Computer Management(Local)’ -> ‘Storage’ -> ‘Disk Defragmenter’
3. Select one drive by drive
4. Click on the ‘Defragment’ button, it may take some time to defragment the drive.
Stage 7 : Remove all applications load at start-up (except the really needed ones)
1. Start -> Run
2. Type msconfig and then click ‘Ok’ button.

3. In ‘System Configuration Utility’ -> ‘Startup’ tab
4. Unmark the tick on the checkbox of the applications that you installed and don’t use as the system starts.
Reason: When your system starts, all the softwares are sharing the memory at the startup till shutdown, even though it’s not used. So its better remove the applications to load at startup to increase the boot-time and system speed.
5. Click ‘Ok’ and then ‘Restart’ button
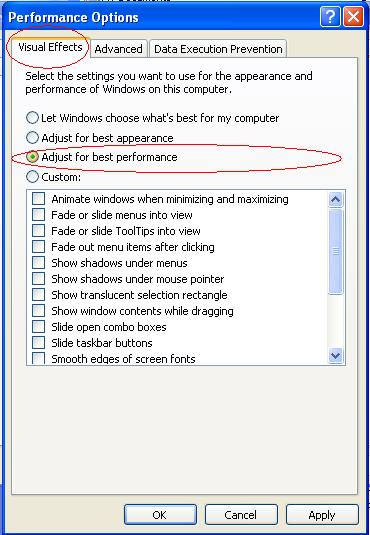
Stage 8 : Set your system for “Performance” mode rather appearance.
1. Right-click on ‘My Computer’ -> Properties
2. Select ‘Advanced’ tab -> Click ‘Settings’ under Performance Section.
3. In ‘Performance Options’ Wizard -> ‘Visual Effects’ tab
4. Select “Adjust for best performance” option and then click ‘Ok’ button.
Stage 9 : Upgrade your RAM to minimum 2GB or more.
1. Upgrade your system physical memory to minimum 2 GB or more.
2. Check the FSB speed and type of your RAM, it can be found out using a software ‘CPU-Z’.
3. Download ‘CPU-Z’.
4. Buy a RAM that matches your FSB and DDR version.